Tuesday, October 30, 2012

Hand Sewing By Candlelight


My Hand Sewing Basket has a new project. 

During the storm's assault on the Northeast, we did lose power yesterday afternoon when a tree on a street at the foot of our hill fell on a utility pole, snapping it and downing the power lines.  This pole also had a transformer that was dangling half-off the broken pole a few feet above the ground.  This resulted in a localized power outage and a couple of streets closed.  Most of the damage in my area was of this nature. Wind gusts and rain but no flooding or major devastation.   We are still experiencing bands of heavy rain ... and ... rut-roh ... the wind is gusting and I just heard thunder ... hopefully we do not lose power again.

Oh, well ... I have my hand project, candles and battery lanterns at the ready if it does.

I am trying my own "Quilt As You Go Hexes" technique.  It is working rather well. 

More later ... time to turn off the computer again ...

stay safe and well ... BBL  ... ;) Pat


Monday, October 29, 2012

Storm's-a-blowin'


Here in the northeast, my quilty kitty and I are watching the storm and sewing ... on my machine as long as the power lasts.  The winds are picking up and getting gusty. The lights have blinked off and on a few times already. 

Over the weekend, we made a custom table cloth destined for my oldest son's new apartment. 


Last month he took me my favorite local quilt shop for my birthday and while we were there he found this fabric in the sale section and asked how difficult it might be to make a tablecloth. My Boy making his first fabric purchase!


His table is an odd size rectangle with rounded corners. 


My new quick curve ruler came in handy for this project.
 
Jon has a nice set of dishes that someone gave him as a houswarming gift a few years ago for his first apartment that are black and green. My Boy has a really nice apartment and he likes making it look homey and inviting and he has a real good eye for this.  He wanted a table cloth that would look good with his dishes and we decided that black would be a nice accent color on the tablecloth. 
 
 
So we decided on a black hem.    

 
This is how it looks on my table. 

Katniss is intrigued by this green print fabric for some reason. 


Maybe the circle print looks like eyes to her.  She keeps jumping on it and trying to pick up those circles.  So I gave her a scrap to play with in her basket near my sewing machine. 


It is not keeping her from helping me sew though.


Now Katniss and I have the quick curve ruler out again and the free pattern that came with it and we are making a special table runner with some of the extra fabric. 

Last night I picked and cut the fabrics for this as called for in the pattern, but somehow they did not look quite right to me.  Then just before bed a had a new thought and had to go digging through my stash to find what I wanted. I found a couple of fat quarters that should be just right. 


sew here a sneak peak at what Katniss and I are sewing.
 
I am really liking the quick curve ruler and am planning to make a full size quilt with it soon.

Whoa!  The power just blinked again ... we may be hand-sewing soon!

Stay safe and well wherever you are, my friends.

May be awhile until I post again ... ;)


Saturday, October 27, 2012

Quilt Bloggers Festival


"Delectably Twisted"
Best Category: Two Color Quilt ... Blues and Browns

 
I am joining in the Blogger's Quilt Festival Fun!

Here is my quilt ... # 325
 
Best Category: Bed Quilt ... Oversized Queen ... 98" X 98"
Machine Pieced and Long Arm Quilted by Pat Broe
Pattern Source:  "Unexpected Twist" by Jess Smith
Custom Border:  "Delectable Mountains


This is my favorite quilt that I have made this year. I had sew much fun sewing and quilting and gifting it.  I made this quilt for my daughter.  The cat in the photo is her kitty, Butterfly, who was very helpful in making and inspecting this quilt.

Close up of Top

 
Butterfly inspected this quilt for comfort before I quilted it, too. ;)
 
Border and Quilting Detail
 
I love participating in the Mystery Quilt Weekends at The Quilt and Needle and sharing the fun in the forum threads and have made many quilts and many friends there over the last few years. Since I made this quilt as a gift for my daughter to take with her to her new apartment, when I saw that the spring mystery was to be a two color quilt I chose two colors that I believed she and her young man would both like, so I picked shades of blue and brown. 
 
Brown/Blue Mystery Quilt Fabrics
 
I bought all the fabrics for this quilt one trip to my favorite local quilt shop, Bits 'n' Pieces in Pelham, NH.   When I decided later to make the quilt larger by adding a custom pieced border, I had to go back to the shop for more of the lightest blue fabric, but I had already bought the last of the bolt of this color. Fortunately I was able to find a lighter blue shade of the same fabric to finish the quilt.

 
Since this quilt was a home warming gift for a new apartment ...


... I made it into an ensemble that included matching pillowcases with pieced borders and toss pillows made with extra blocks and pieces from the quilt and ...

 
also included a Table Topper, Mug Rugs and curtain tiebacks

... to make her new home cozy, comfy and quilty. Whenever I make a quilt, I like to use up extra fabric, blocks, units and such to make other quilty goodies to go with the quilt. My daughter and her young man were very pleased with their apartment warming gift.
 
For those interested in reading more of the making of this quilt,  I have several posts on my blog in May and June, such as this one, with more details about the sewing and quilting.
 
 Butterfly on folded pieced quilt back

Butterfly loved this quilt and did not want to see it leave.  Maybe she just did not want to see "Our Girl" leave home.  My daughter thought about taking her kitty with her to her new apartment, but at twelve years old, Butterfly seems a little too settled into her old home to want to move and share life with their new puppy. So now Butterfly and I are keeping each other company  ...

Quilty Puppy Love

... and the quilt is in its new home with a puppy to cuddle.

Thanks to the Blogger's Quilt Festival for giving me the chance to share my quilt and welcome to all who stop by to visit.  I am looking forward to seeing all the other quilts in this big lovely online quilt show.

Have a happy quilty day!

:) Pat


Monday, October 22, 2012

"Curve It Up" Quiltalong


"Curve It Up" Quiltalong Block 1
 
I have a new quilty toy. 

I have also joined the  Curve It Up Quiltalong on the Sew Kind of Wonderful Blog. 

On Pinterest I saw the Urban Nine Patch Quilt that Jenny Pedigo made and it is sew gorgeous.  I started reading her blog and found many lovely quilts and patterns.  Last Friday, I found the post that had her Quick Curve Ruler on sale with free shipping and just could not resist.  I want to make an urban nine patch quilt.  My ruler arrived today very well packaged and it also included a free table runner pattern.  I sew happy!  :)


For this quiltalong my main focus fabrics are from a "Serenade" layer cake from Kate Spain.  I will be using a light gray background fabric and will pull other stash fabrics, as needed.


I watched all of Jenny's how-to videos for her ruler and followed the instructions in her block tutorial on her blog exactly and my block worked up perfectly.


I like sewing curves and found these very easy.

 
The ruler is used to cut the fabric and then to also square the blocks.

I am sew looking forward to the next block.

Thanks, Jenny!
 
:)

Saturday, October 20, 2012

The Old Red and Blue - November Swap Blocks


November is my pick for the Stitchin' Sisters Swap group at The Quilt and Needle and I chose The Old Red and Blue Block from The Quilter's Cache in scrappy medium reds, denin to medium to navy blues and white tone-on-tone.  I really like these blocks and the secondary pattern that appears when you place them next to each other.  I hope my Stitchin' Sisters will like it, too.


I printed the block instructions and made a sample block as written but my block came out a little small, so I designed my own plan to make these blocks so that they come out a perfect 12.5" unfinished squares. You may find the instructions as written work fine for you. Sometimes I just have to find my own way of doing things.

Since a couple of my Stitchin' Sisters have asked for a tutorial, here is how I made these blocks ...

Cutting:

Red ... one 3.5" square and four 2.5" squares per block

Blue ... four 2" x 5" rectangles, four 2" by 3.5" rectangles and four 2" squares per block

White ... one 4.5" square, sixteen 2" squares and one 2.5" WOF strip per block


Cut the white 4.5 inch square on the diagonal twice to make 4 triangles

Sewing:

For making these units I like Bonnie Hunter's Square in a Square Tutorial on Quiltville.  Bonnie cuts her triangles a bit large to give them plenty of "fudge room" to trim and square them.  I like fudge ... especially chocolate fudge. ;)


To make the square in a square centers, sew a white 4.5" triangle on opposite sides of the 3.5" square. 

press toward triangles and trim dog ears


Sew on the other two opposite sides.  I always like to check my seam allowance to be sure I am sewing an accurate 1/4" seam.


press toward triangles


My SIAS units when pressed, squared and trimmed measures 5 inches square. This may be larger than intended by the block designer, but it works for me if I adjust the size of the white sashing rectangles.


In my sample block, I thought the white rectangles in the original cutting instructions were the biggest problem to preventing my block from laying flat or coming out to the correct size.  So I used this method to sew the frames on the square in a square centers.


I laid a 2.5" white WOF strip right side up on my sewing machine bed and laid the red SIAS units face down and sewed one after the other onto the white strip.  Then I laid a second strip right side up and sewed the other side.


Then I cut the units apart carefully  and pressed the seams toward the white triangles.  

trim, if needed
 
I then measured and cut the rest of my white strips into 2.5" by 5" rectangles.


I sewed the red 2.5" squares on either end of the 2.5" X 5" rectangles.
 My quilty kitty helper made sure I was doing this right.

press toward white rectangles
 

Then I sewed these onto the opposite sides on my SIAS unit. 


I found these 5" strip units fit and the seams nested perfectly.


Press outward toward white rectangles

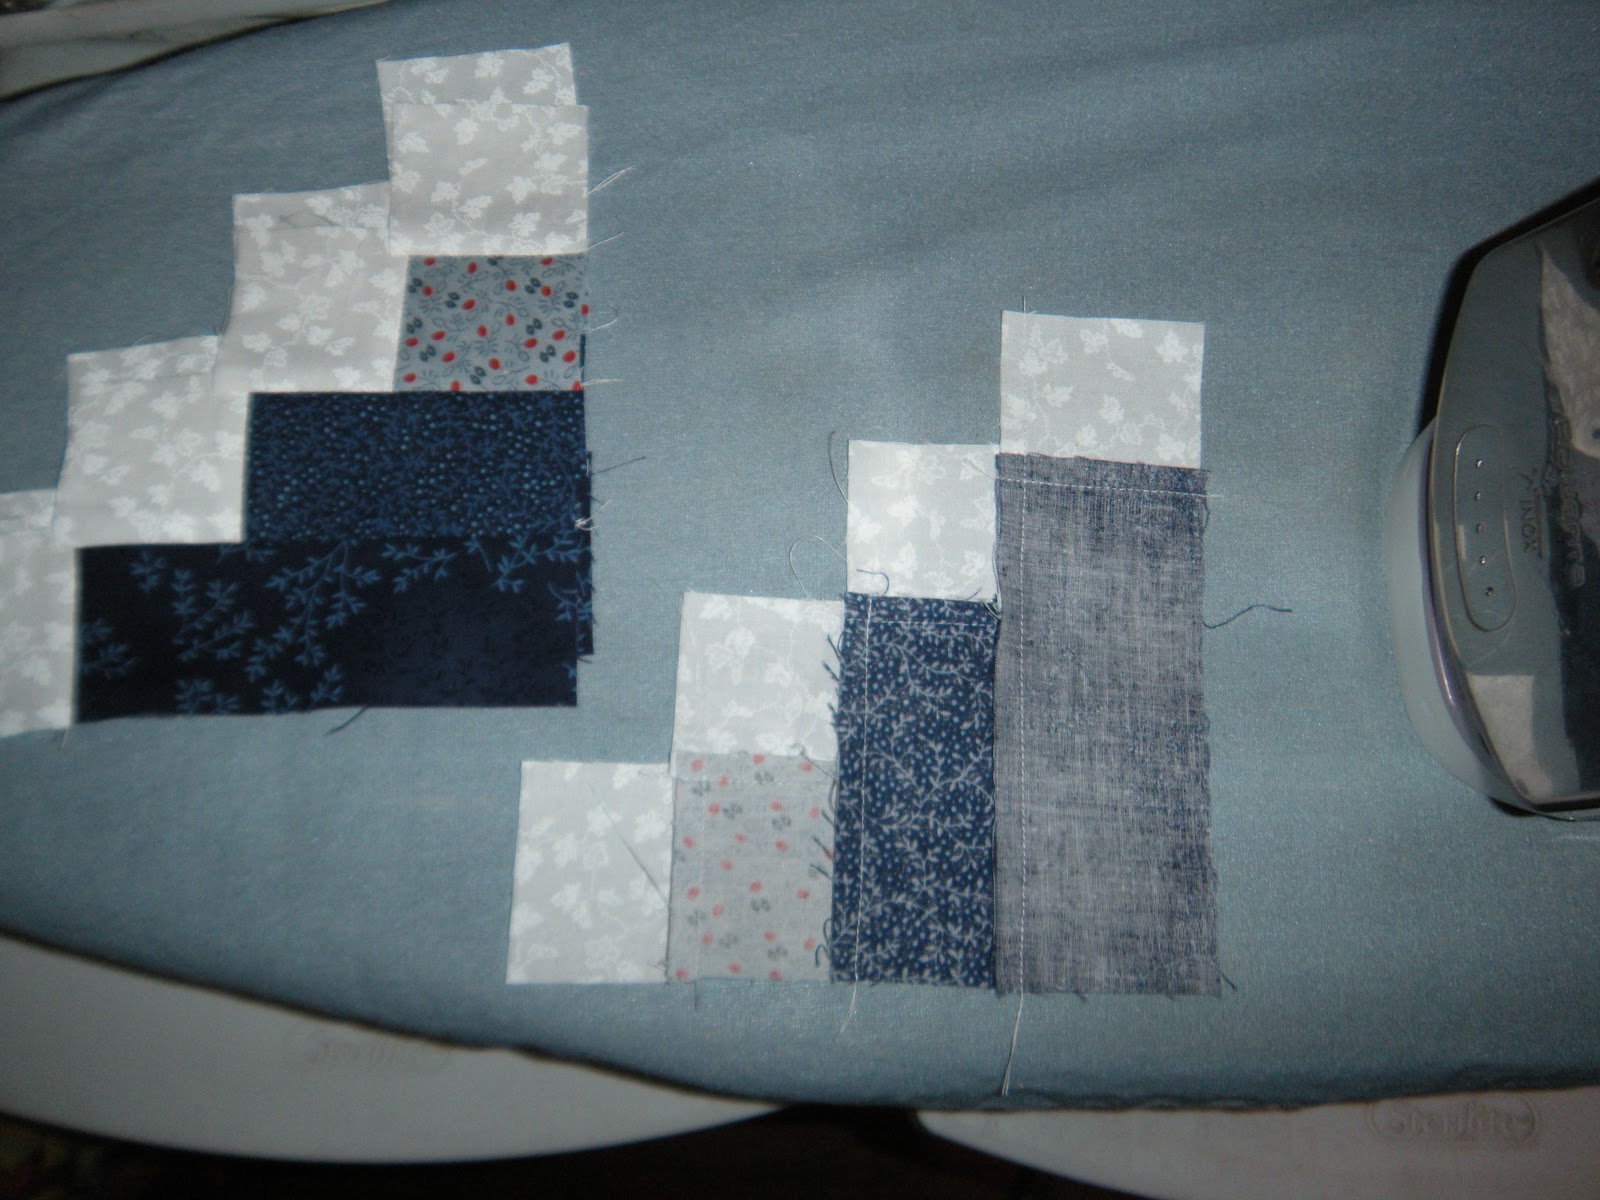
I also made a change to the method of sewing the blue striped corner triangle units.

Instead of cutting the small white triangles in the original instructions, I cut 2" white squares and sewed one white square to an end of each blue rectangle.  


press toward white squares


Align the blue strips so the small blue square is on the right. 

chain piece strips together/press toward white squares
 
sew white square on side of blue square and press toward white square
 
make 4 identical scrappy corner units per block
 

press toward white squares
 

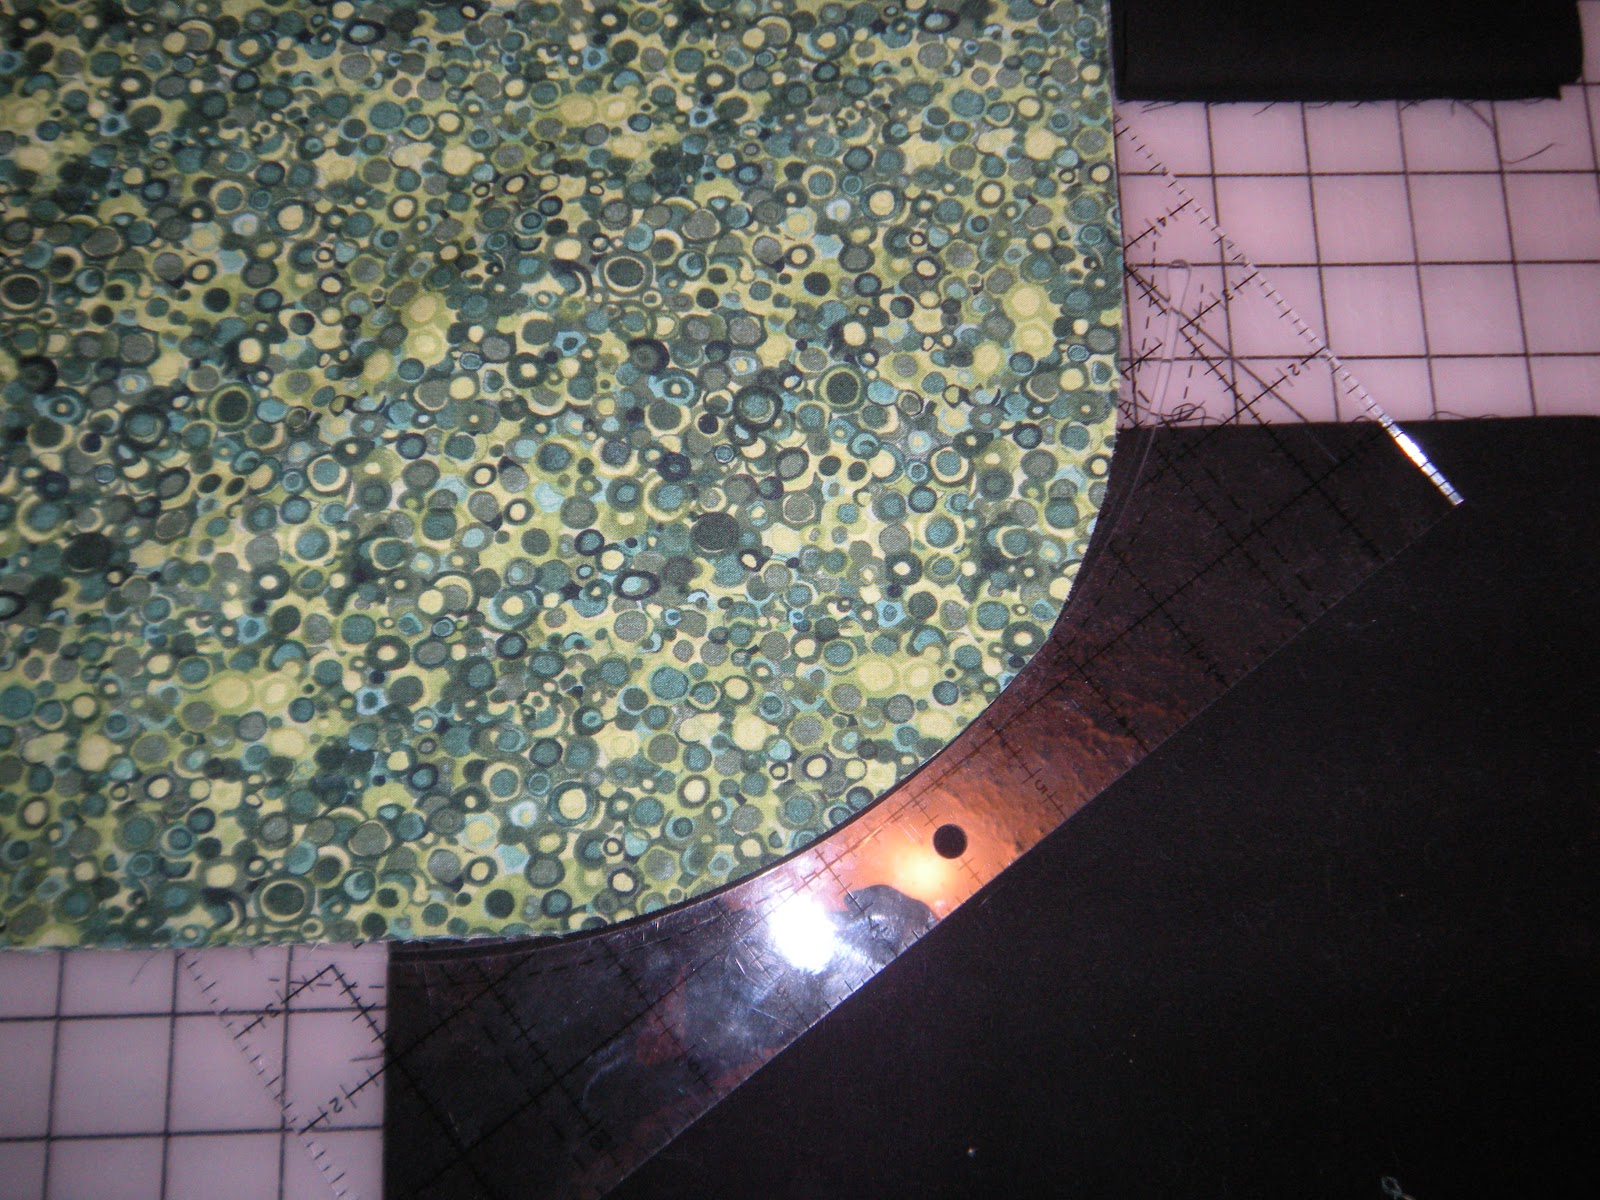
align ruler to allow a 1/4 inch seam and cut off the extra fabric


this will cut away 4 tiny white triangles
(which may be saved for another purpose if you make mini quilts)

Lay out the corner triangles around center unit before sewing and check the orientation of the blue strips. This will ensure that the finished blocks have the blue strips aligned in the counterclockwise rotation as shown in the block instructions.


Sew opposite sides first, as in square in a square blocks

 
press outward toward triangles


pin and sew last two opposite sides, removing pins as you sew 


 press toward triangles


finished block should measure exactly 12.5" square
with little or no trimming


these blocks are kitty inspected and approved


Six Swap Plus One Charity Blocks
Ready to send!
 
:-)