Friday, November 30, 2012

Snowpeople Table Runner Done!


I finished the binding on my sparkly Snowpeople Table Runner!
 
It is a grayish day here ... not good light for taking pictures. There is some sun, but it is covered with thin clouds.  It is also chilly. Winter may be a month away according to the calendar and solstice, but it has arrived in New England.

For details on the quilting and pattern and such read here.

In January I hope to be sewing a quilt with the rest of the squares from the fabric swap.  I am in the thought process of trying to decide what pattern to make.

My dining room is looking very festive.
 
I hope to get some quilting done today on my Tumbling Blocks Table Topper.

Tomorrow we going to find our Christmas tree. We always have a family get together for this and I also have some cookies to make today for our tree decorating party.

Have a happy quilty day!
 
:-)
 

Thursday, November 29, 2012

Tumbling Blocks Tutorial - Part 3 - Finishing Borders


I completed the top for my Tumbling Blocks Table Topper!


First I cut off the points in the setting triangles on the top and bottom to form a straight edge with a quarter inch seam allowance for adding the border strips.


The I cut four 4" WOF strips for the border.  I decided that since the finished dimension of the diamonds in the blocks is 3 inches that a 3.5" finished border would be good proportionally.  This will finish my topper to the 25" square that I planned.  I will go with the tiny black print that I used for the dark fabric in the blocks for the binding as it really frames the quilt well.


I pinned and sewed on the borders ...

... and now I have another top ready for quilting.
Must get quilting!

I am finishing up the binding on my Snowpeople Table Runner today ...


I sewed down the white flange first because it seemed that despite pressing it was standing up a little on my runner and I wanted to sew it down before I did the hand sewing on the binding to hide the seam line under the binding folded to the back.

Then I started handsewing the binding to the back ...


... with a lot of help from "The 'Niss," as my hubby has taken to calling Katniss.


Katniss really likes to take a close-up look as my Quilty Inspector.
She is sew helpful ... ;-)

Part 4 ~ Quilting and Finishing

 ... and photos of my new small quilt.

Enjoy!

:)

Wednesday, November 28, 2012

Easy Tumbling Blocks Tutorial - Part 2 - Piecing and Sewing

Easy Tumbling Blocks
Sew Into Strips

The tricky cutting part is over. 


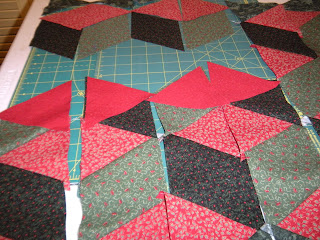
 The sewing is easy chain piecing the diamonds and triangles into strips
 and then pinning and sewing the strips together.


Keep your blocks laid out next to your sewing machine.  I like to work in small sections and lay my sewn units back down next to my unsewn ones so that I am less likely to make a piecing error. 


Start by piecing together two pieces in a strip.  Carefully match the long points of the diamond to one of the triangles. 


Sew the same pieces in each row, one after the other in chains.  After you have done this unit in each row, snip the threads chaining them together and place them back down in place on the table.


Finger press flat the light triangles toward the medium or dark fabrics as you sew.


Continue to sew the next triangle or diamond to each strip.


Align each seam carefully before sewing.


Continue in this manner until all the pieces in one strip are sewn together.


Using your iron, press seams toward the darker fabrics,


These are my strips sewn together, but not trimmed.  The red fabric on some of the long edges sticks out, as do the "dog ears."


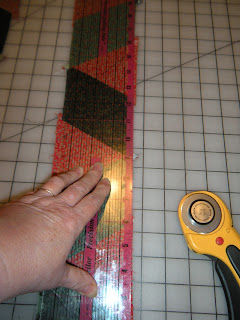
Carefully trim extra fabric and the dog ears from the long sides of your strips to have a clean straight edge.  I am using my 3.5 inch ruler, one of the first quilting rulers that I bought, to make sure my strips measure an accurate 3.5 inches across.  You can use any ruler that you use for cutting strips to measure and trim.


After trimming my strips, I had very little waste.


Lay your trimmed strips back out on the table near your sewing machine.


Sew two strips together at a time.


Pinning is important. Always remember to remove pins as you sew to avoid breaking your needle.


Pin the points of the light triangles by first inserting a pin straight through the very tip of the light fabric below the seam.


Then add a staying pin to either side of this point.


Align and pin the dark and medium fabrics together, too, at each intersection. Match seams and pin in the light fabric just next to the seams.


Check each strip seam after you have sewn it to see if your points are matched correctly.


The points are not aligned correctly in this seam.  I like to take the time now to remove a few stitches, repin and resew, so that I will not have to see my errors after my quilt is finished. I know I am always going to find mistakes in my quilts after they are done and I do not expect to ever make anything that is "perfect," but I like to know I did the best I could.


I carefully  remove only a few stitches each side of the intersection.


Then I repin and resew that intersection being careful to keep the same stitching line.


The little bit of extra time I took to resew a couple of seams really makes me happy when I look at my blocks close up.


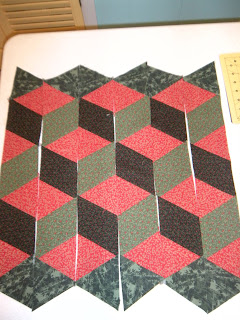
After all th strips are sewn together, press seams flat.  I pressed all in one direction.


Here is my completed Tumbling Blocks, ready for me to add the borders to make my table topper.


For the complete how-to, in parts, click on


Time to sew!
:)

Easy Tumbling Blocks Tutorial - Part 1 - Cutting Instructions


Easy Tumbling Blocks

No "y" seams!

This tutorial has been featured on the Craftsy Blog!

Links for the Complete Tutorial my be found by Here

Fabric Selection and Cutting

When making this pattern it is important to choose 3 fabrics with good contrast in terms of value.  Value refers to the lightness or darkness of a fabric. When deciding on fabric, first choose one dark fabric ...  and then one light fabric ... then select medium fabric that has a value about halfway between the two.  To make the 3 dimensional illusion of the blocks "pop" you want good contrast between your fabrics.  It may be monochromatic, as in three fabric in the same color family, or three different colors. The color wheel is a good place o start when choosing colors.


To test this method, I am making a table topper for Christmas, with some fabrics that have been in my stash for some time.

It will finish abut 25" square.


I chose red, green and black Christmas fabrics in my stash of which I had about one yard pieces to make my table topper.

Cutting instructions are for 3 inch finished diamonds:

For the blocks ...

Light ... cut two 4 inch strips WOF (width of fabric)

Medium and Dark ... cut two 3.5 inch strips WOF

I also used one 4 inch strip of fabric in a different dark green/black print for the setting triangles and will be using strips of the same fabric for borders.

Cutting the blocks :

To cut the diamonds and triangles needed for this method you will need only regular straight cutting rulers, rotary cutter and mat.


If you have never cut a 60 degree angle before, study you ruler and mat and find the 60 degree lines on each.

It does not matter what type of mat you have ...


Cut a test 60 degree diamond and triangle from scrap fabric.  These were cut from a 2.5" strip ...


Without moving the fabric, turn your ruler 180 degrees and lay the ruler on the edge of the fabric to cut a 2.5" diamond


You should be able to see the diamond shape through your ruler. 

If you like what you seem cut.  You should now have a diamond with equal sides and a 60 degree angle on the long ends and a 120 degree angle on the wide ends.

[Note :  These pictures were rotated automatically by the blog program and it is not letting me rotate them properly.  Sorry about that.]

Now to test cut an equilateral triangle, equal sides and three 60 degree angles ...


Turn your fabric strip so the cut edge is on a line on your mat and your ruler so it is on the 60 degree line on your mat. If you look closely, you will also see the 60 degree line on my ruler.  Cut the triangle.

These are the two basic cutting units for making these Easy Tumbling Blocks.

When you are confidant about cutting the shapes, you are ready to start you Tumbling Blocks.

light and dark strips

Cut your WOF strips from your medium and dark fabrics for your blocks. I stacked my medium and dark fabrics together for easier cutting. 

light strips
If you know what fabric you want for your setting triangles (on the top and bottom of your tumbling blocks) you may also cut these 4" strips at the same time.  If you are not sure what I mean or have not decided yet, cat and layout your blocks first and cut the setting triangles later.


Then cut your diamonds from the stacked medium and dark fabric strips

Cut equilateral triangles from your light strips.


To do this I first cut 4" diamonds ...


 and then cut them in half, as I did with the light fabric for my blocks


OR

 Cut equilateral triangles from your strips, as I did for the setting triangles for my quilt

setting triangles
It is important to note that the light fabric and setting triangles are larger than the diamonds.  This is needed for accurate and straight piecing.  A half inch larger worked well for me.


Lay out your diamonds and triangles on your table or a design wall

I just laid my pieces out on the table near my machine, but a piece of flannel or batting or a flannel backed plastic table cover makes a good surface on your table if you do not have a design wall, as the fabrics will stick to the flannel. 


block layout with different border fabric for the setting triangles
Here is an alternate layout using top and bottom setting triangles cut from the medium and dark fabrics ...

three fabric layout
If any of this is as clear as mud, please feel free to post a question in the comments or email me.


:)