Wednesday, October 30, 2013

Little Blessings ~ In Progress

A Little Blessing Quilt
Ready to Quilt!
 
It is a  gray and rainy day here in my quilty corner,
so this is the bets I can do for photos right now.

I started this quilt Here


close up of fabrics and blocks
 

 Pattern from Andover Fabrics
 
This is a free online quilt pattern and the .pdf may be found Here
 
I changed this pattern by adding a row on the bottom to make it rectangular. My quilt top measures 50" by 56"


I also made this a scrappy "I Spy" farm animals type quilt by adding some  squares that I fussy cut from scraps from other projects.

little blessings flannel

This is the flannel backing fabric I found online for this quilt.
 

green gingham check
 
Here is the binding fabric that the baby mommy picked out.
 
Time to quilt!
 
~ <3 ~ 

Monday, October 28, 2013

Quilt Bloggers Festival ~ My Hugs and Kisses Baby Quilt ~ Entry # 2

My Hugs & Kisses Baby Quilt
 
 
Here is my 2nd Entry into this big beautiful online quilt show!
 
@

 My Hugs and Kisses Baby Quilt
  
Quilt Measures 52" square
Scrappy pink/green/white, includes "Love is in the Air" by Moda Fabrics
Pieced and Quilted on my home machine: Janome 6600p
Pieced scrappy heart backing, my own design


Pattern Info:
Pattern is from QuiltPox. Click here for this Free Pattern. 
 
 I made this quilt earlier this year and featured it in my
 
 
pieced backing
 
 
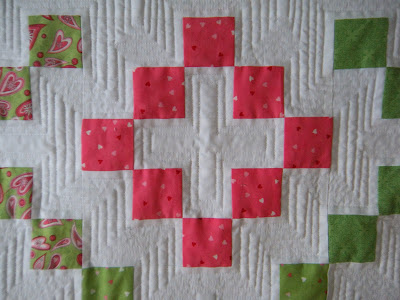
close up of quilting


This quilt is Quilty Kitty Tested and Approved!
 
 
This is Katniss' favorite quilt!
 
 
from start
 
 
to piecing
 
 
and pressing
 
 
 to binding


When I took these photos she went behind it, too.
Here I think she is saying,
"Okay will you please take it down now and give it back please!"
 
Katniss and I hope you have enjoyed your visit to our scrapatch today!
 
Thanks for visiting us!
 
Enjoy all the quilts in the QBF!
 
~ <3 ~
 

Sunday, October 27, 2013

Spider Web Quilt-Along 2013 Wrap-Up!

The Spider Web Quilt-Along is Complete!

Here are the links to each step:


I hope you have enjoyed this pattern.
Please contact me if you have any questions or suggestions.
I would love to see your Spider Web!


Have a Happy Quilty Halloween!


Edit:  For a larger version of this quilt:

Click Here

for my updated and revised


Spider Web Quilt-Along 2014

~ <3 ~

Spider Web Quilt-Along ~ Part 5 ~ Quilting, Binding & Finshing!

 
Time to Quilt!
 

Measure your web from point to point to determine your backing size.

I cut a 30" square of black backing fabric.

Then I cut a piece of batting the same size.

I used a stiffer polyester batting for this one to help give the points stability: "Soft and Bright" by Warm Company. 

 
My quilting thread was this spool of
Superior "Nite Lite"
which is a glow-in-the-dark polyester thread.
 
 
I usually use Superior "King Tut" Cotton or Aurifil Quilting weight cotton for quilting.  This was the first time I used polyester thread and it worked well with my regular Microtex Quilting needle.
 
 
First I quilted the spokes outward from the center.


Then I quilted around the center circle applique and then
I  quilted each curve of the web.


I stopped and lifted my walking foot and turned the quilt
to re-align for each arc of the web. 
 
 
After sewing the inside curves of the web,
I cut the eight sides of my quilt straight.
 
 
The I added the outside quilting lines in the outer border.
I marked the inner and outer points on the first curve and
stitched removing the pins as I went.
 
 
After the first curve I just eyeballed the inside center point for the curve by looking for the seams of the charms.
 
 
The quilting is done!
I like the simple straight lines of this web.
You may want to add more lines
or do your own quilting design on your quilt.


I measured my points at this time to make sure they were a even length
and I put one pin to mark the correct length for each point
and I cut the points to 1" beyond the pin, as needed,
removing the pins as I went around the sides.
 
 
To prepare the quilt for binding,
cut the curves for the web using the Quick Curve Ruler or whatever you have been using to cut the curves.
I cut 1/4" beyond the edge of the black border fabric.
 
Front
 
Back
 
Ready for Binding!
 
Binding strips

Cut binding strips from your front border fabric or your choice of binding fabric:

1 and 1/2" strips ... I cut 3 WOF strips and had plenty.

Sew your binding strips together into one long strip.

I did a single fold binding.
 
 
Sew  your binding to the front of your quilt, starting at one point,around using a 1/4" seam from the edge of your border fabric
 
 
Ease your curves gently without stretching the binding strips.
At the points, make a fold to match the lines
of the points; mine was about a 60 degree fold.
 
 
Fold the binding over to the back, pinning the corners
or using binding clips according to your usual method
 
 
hand sew the binding to the back using an invisible hem stitch
Remove pins as you go.
 
 
Done!


And Fun!
 
 
Thank you for following along my
Spider Web Quilt Tutorial!

 Links to all the steps may be found here!
 
If you have any questions as to the technique that needs clarification
or suggestions to improve this tutorial,
 please feel free to post in a comment
or email me. 
 
If you sew one of these, this year or next year,
I would also love to see photos of your finished quilts!
 
If you post pictures on your blog or flicker album or online,
please link back to my pattern on my blog.
 
My email address may be found at "Contact Me" in the bar
at the top of my blog.
 
Happy Quilting and Happy Halloween!
 
:) 


Saturday, October 26, 2013

Quilt Bloggers' Festival ~ Entry #1 ~ Wall Quilt


Spider Web Quilt
My Original Design 
27" inches point to point
 
 
Wall or Table Quilt
 
 
Kona black solid backing
 
2 "Boo Crew" Mini Charm packs,
1/2 yard black mottled grunge fabric for webbing and border and binding


hand appliqued center
 
 
Pieced and Quilted on my Janome 6600p
aurifil 50/2 cotton for piecing
Glow in the Dark Nite Lite Thread by Superior Threads
straight line machine quilting
 
 
free tutorial is available on my blog HERE!


Happy Halloween!
 
My skeleton friends and I hope you have enjoyed our quilt!
 
This quilt was featured in my


Giveaway Closes on Oct 31st at Midnight EST
 
 
Thank you for visiting My Scrapatch!
 
 
:-)